SOLVED: Install OS from Bootable USB Drive on Dell T130
One of our senior network engineers recently came across a basic Windows 2016 installation issue on a Dell T130.
When searching for a solution, he turned to the helpful article below:
https://www.lmeservices.com/bootable-usb-drive-dell-poweredge-t430/
T130 Problem:
- Unlike our technician who was installing on a T130, the source couldn’t install Windows Server 2016 OS onto a PowerEdge T430 via USB. Every time an attempt was made to install, an error message occurred stating, “no bootable media.”
Although the source and our technician were installing on different server models, the solution is workable on both.
The source attempted several solutions that failed. Then, he contacted Dell Support who told him that Dell PowerEdge T430’s out of the box BIOS 2.4.2 build doesn’t support UEFI on USB Drives.
Thankfully, there are several solutions that can resolve this issue.
-
Solution 1:
- The source recommends creating a DVD of the OS.
While the source in the article recommends this as a solution, our technician said that the OS is too large to put on a DVD.
-
Solution 2:
- The source also recommends setting the boot settings to BIOS instead of UEFI. This solution is suggested as a last resort because this means the hardware will only recognize 2TB of drives usage and would prevent the source from exceeding 2TB usable space.
-
Solution 3:
- Install a program that will properly format a USB drive to adhere to the Dell PowerEdge new standards.
Our technician found this to be the most effective solution.
Here are the steps that he and the source completed to resolve this issue:
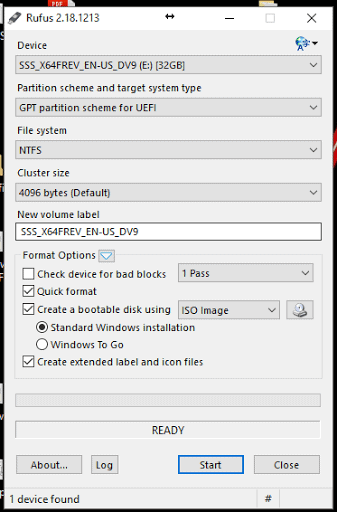
- Install Windows Server 2016 on Dell Server using USB stick UEFI and GPT by downloading the tool from https://rufus.akeo.ie/
- Start the tool as administrator.
- Select the USB storage device then make the partition scheme and target system type to be GPT “partition scheme for UEFI.”
- Give it the ISO image of windows server 2016 and let the tool create the bootable USB.
- In the server boot settings make it UEFI and then make the partition GPT.
- Convert partition MBR to GPT.
- While the source who wrote the article found this to be an essential step, our technician didn’t find it necessary.
Once the steps are completed, it will look like this:

- Solution 4: The source also recommended installing the Windows Server OS via the iDrac. If you don’t have a license for iDrac, you can use a 30-day trial signup.
- Copy the ISO of the O.S. you want to install to a local machine.
- Configure the iDrac from the BIOS settings of the server.
- Plug a network cable into the iDrac NIC on the server.
- Give the iDrac card an IP address via the BIOS.
- Now, from your local machine, go to the Web GUI in Chrome using the IP address of the iDrac card.
- The login is root/calvin.
- From the Virtual Console in the iDrac, go to the ‘Virtual Media’ menu on the iDrac remote session and select the ISO.
- Remember, this requires a fully licensed iDrac.
- Go to the ‘Next Boot’ menu and choose the ‘Virtual CD/DVD/ISO’ option.
- Reboot the server from the iDrac and it should boot directly to the installer or at least recognize it as bootable media.
For more information about Dell, check out our partner page.
