Unattend.xml to Sysprep your Image and not disable local Administrator
Unattend.xml to Sysprep your Image and not disable local Administrator
Tools needed
- Windows system Image Manager “This is part of the WAIK installs”
- Windows 7 Install.wim, Boot.wim (Found on your windows 7 installation media in the Sources folder)
Note: copy these files locally and remove the “Read-Only” Attribute from each .WIM
Building your answer file using Windows (SIM)
Be sure to open this application by using the “run as administrator” option
-
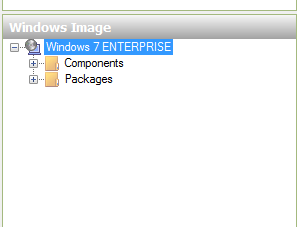
- Open the “Install.WIM” using the “File and Select windows” option within Windows (SIM) Figure 1
Note: This step may take a bit to mount this image file (You will be prompted for the Windows version you want to build the file for… Once complete you will see the Components and Packages retrieved from the WIM file.

-
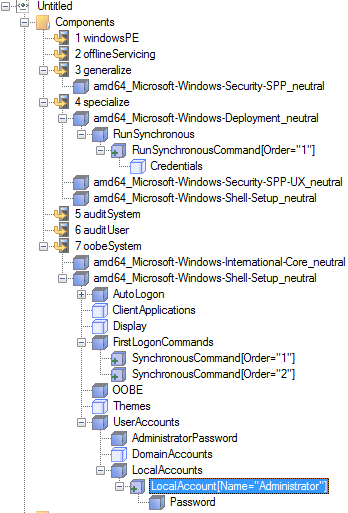
- Next you will need to open a “New Answer File” Under file option in figure 1 and add the following components in the order shown
- Generalize
- Add amd64_Microsoft-Windows-Security-SPP_6.1.7600.16385_neutral – right click and add to Pass 3 Generalize
- Change Setting to SkipRearm to value 8

- Change Setting to SkipRearm to value 8
- Add amd64_Microsoft-Windows-Security-SPP_6.1.7600.16385_neutral – right click and add to Pass 3 Generalize
- Specialize
- Right click and Add amd64_Microsoft-Windows-Deployment_6.1.7600.16385_neutral – right click and add -RunSynchronous- pass 4 Specialize
- Change the following settings to reflect the Screen Shot

- Change the following settings to reflect the Screen Shot
- Next add SkipAutoActivaction using – Right click and add pass 4 Specialize- amd64_Microsoft-Windows-Security-SPP-UX_6.1.7600.16385_neutral
- Change the following setting – SkipAutoActivation to the value True

- Change the following setting – SkipAutoActivation to the value True
- Next add amd64_Microsoft-Windows-Shell-Setup_6.1.7600.16385_neutral – click and add pass 4 Specialize (Note you can remove the sub components that are not needed)
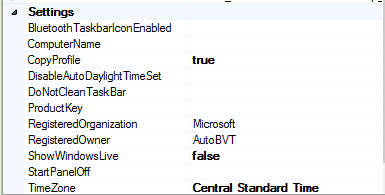
- Change for the following settings to reflect

- (Please view TimeZone settings hereNote:later we will input License names etc into a different component
- Change for the following settings to reflect
- Right click and Add amd64_Microsoft-Windows-Deployment_6.1.7600.16385_neutral – right click and add -RunSynchronous- pass 4 Specialize
- oobeSystem
- Right click and Add Pass 7 oobeSystem – amd64_Microsoft-Windows-International-Core_6.1.7600.16385_neutral
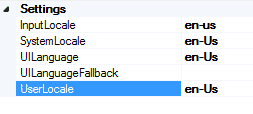
- Fill in en-us in the ones in picture

- Fill in en-us in the ones in picture
- Right click and Add Pass 7 oobeSystem – amd64_Microsoft-Windows-Shell-Setup_6.1.7600.16385_neutral
- Fill in the following with your Information

- AutoLogon Section
- Enter the following

- Enter the following
- Password Section
- Enter your Password

- Enter your Password
- FirstLogonCommands
- Right click and add new Synchronous commands

- Right click and add new Synchronous commands

- You will now have the following under “FirstLogonCommands”

- You will now have the following under “FirstLogonCommands”
- Right click and add new Synchronous commands
- OOBE
- Next Select OOBE and adjust the following

- Next Select OOBE and adjust the following
- UserAccounts

- AdministratorPassword
- Add the value you want the password to be My example shows Password123!

- Add the value you want the password to be My example shows Password123!
- This time we will right click Local account and (Insert New Local Account)

- Fill in the unique values you need

- Fill in the unique values you need
- Your tree in the end should look like the following ScreenShot if you added what I’ve discussed above
- AdministratorPassword
- Fill in the following with your Information
- Right click and Add Pass 7 oobeSystem – amd64_Microsoft-Windows-International-Core_6.1.7600.16385_neutral
- Generalize
- Next you will need to open a “New Answer File” Under file option in figure 1 and add the following components in the order shown

Finally Validate your Answer file from a option under “Tools” and Save your Answerfile naming it unattend.xml for testing
- Once you have everything configured correctly, Copy or move your unattend.xml file to : C:windowssystem32sysprep
- To test open your command Prompt as an “Administrator” and change to the directory path above. Execute the following command sysprep /generalize /oobe /unattend:unattend.xml /shutdown
- Once your machine is turned back on it will go through the boot up process with a Sysprep that will prompt you to ONLY change the computer name. It will then Auto-login as the Administrator account so you can proceed with your final steps.
Summary
This walk-thru guides you through steps to do the following
- Enable Administrator Account with a specific Password
- Insert you Volume License
- Name your Computer
- Remove the need for a multi-part interaction
For assistance with your project, please see our pages for Microsoft System Imaging.


